There’s just something magical about miniature desserts, isn’t there? For me, it takes me right back to my grandmother’s kitchen, where every tiny treat felt like a treasure. These Mini Chocolate Tarts are exactly that – little bites of pure chocolate bliss that are perfect for any occasion. They’re elegant, surprisingly easy to make, and always disappear first from any dessert spread!

Why You’ll Love This Mini Chocolate Tarts
- They’re perfectly portioned, so everyone gets their own little indulgence.
- The rich, smooth chocolate ganache is absolutely divine.
- The buttery, flaky crust is the perfect contrast to the creamy filling.
- They look incredibly impressive but are actually super simple to whip up!
Ingredients You’ll Need
- Unsalted butter: Softened to room temperature, this is key for a smooth, creamy dough and ganache. Don’t use cold butter!
- Powdered sugar: For the tart shells and whipped cream, it dissolves beautifully for a smooth texture. Granulated sugar won’t work the same here.
- Large egg: Room temperature helps it incorporate better into the dough, making it more cohesive.
- All-purpose flour: The backbone of our delicious tart shells. No special flours needed!
- Dark or semi-sweet chocolate: Use good quality chocolate here, as it’s the star of the show for the ganache. Chips work, but a chopped bar melts more smoothly.
- Heavy cream: Essential for both the rich ganache and the fluffy whipped cream topping. Look for at least 36% milk fat.
- Vanilla extract: A little touch of vanilla always enhances chocolate flavor.
- Fresh fruits: Strawberries are classic, but feel free to get creative with raspberries or blueberries!
- Flaky salt: This is an optional but highly recommended touch that really makes the chocolate sing.
How to Make Mini Chocolate Tarts Step by Step
First, let’s get those tart shells ready. You’ll start by mixing your dry ingredients – flour and salt – in one bowl. Then, in a larger bowl, beat your softened butter and powdered sugar until it’s light and fluffy. This is where the magic happens for a tender crust. Next, beat in your room temperature egg until everything is well combined.
Now, gradually add your flour mixture to the butter mixture, beating on low speed until it forms a soft, crumbly dough. Don’t worry if it looks a little shaggy at first; just gather it onto some plastic wrap and press it into a disc. Pop that into the fridge for at least two hours – chilling is super important for preventing shrinkage and keeping your shells flaky. Once chilled, roll it out and use a cookie cutter to make your rounds, then gently press them into a muffin pan. This might feel a little delicate, but take your time. Chill the pan again while your oven preheats to 350°F.
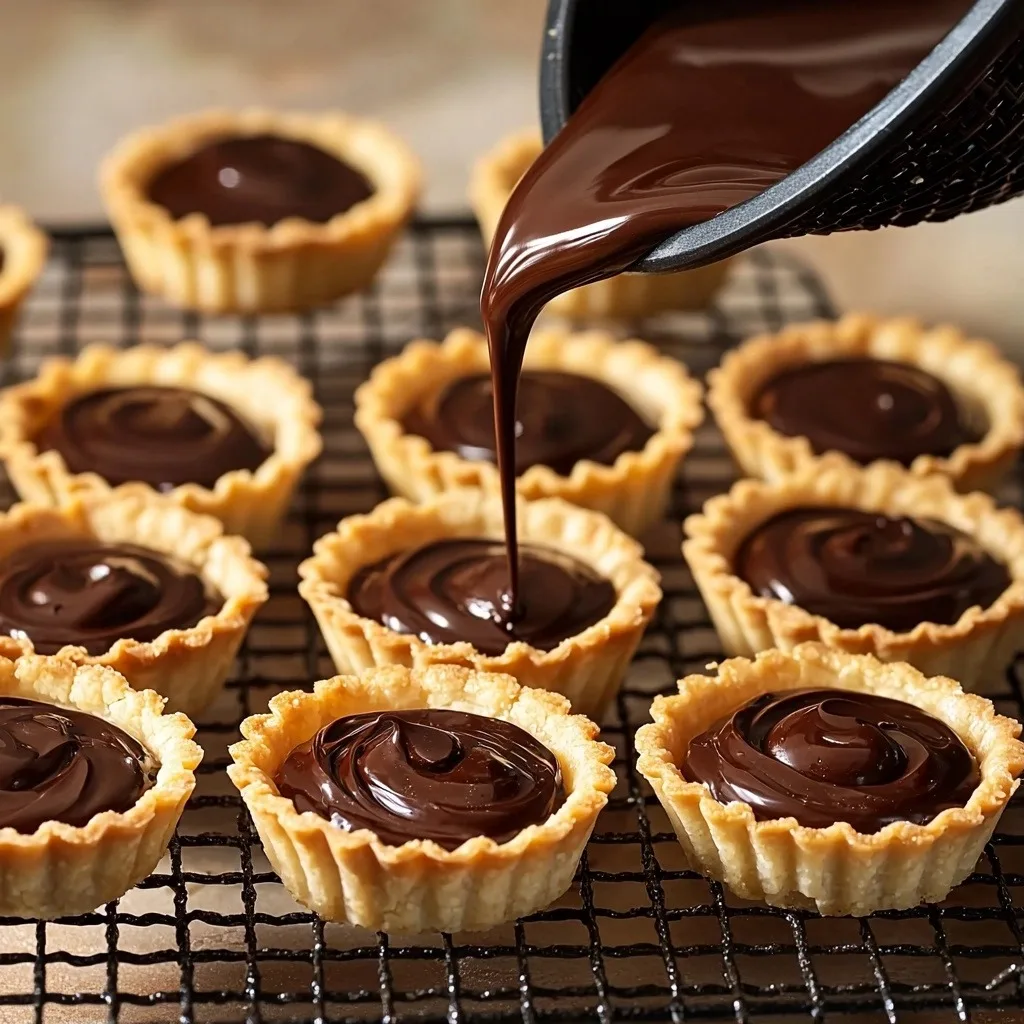
Before baking, line each tart shell with a muffin liner and fill it with baking weights or rice. This prevents the crust from puffing up. Bake for 18-20 minutes until they’re beautifully golden brown at the edges. Let them cool in the pan for a few minutes before transferring them to a wire rack to cool completely. For the ganache, simply heat your heavy cream until it’s simmering, then pour it over your chopped chocolate. Let it sit for a few minutes, then stir until it’s smooth and glossy. Fill your cooled tart shells, and then whip up some cream with powdered sugar and vanilla for a dreamy topping. Pipe it on, add some fresh fruit or a sprinkle of flaky salt, and you’re all set!
My Top Tips for Success
- I always make sure my butter and egg are at room temperature for the tart shells; it makes a huge difference in the dough’s texture.
- Don’t skip chilling the dough! Trust me, it helps prevent the shells from shrinking in the oven.
- When pressing the dough into the muffin pan, be gentle. If a tear happens, just patch it with a tiny piece of extra dough.
- In my experience, using good quality chocolate for the ganache really elevates the flavor of these Mini Chocolate Tarts.
- Let the ganache cool slightly before filling the tarts; it will thicken up and be easier to pipe.
- For super stable whipped cream, make sure your heavy cream is very cold before whipping.
Common Mistakes to Avoid
- Overworking the dough: This can lead to tough, chewy tart shells. Mix just until combined.
- Not chilling the dough enough: Your tart shells might shrink or lose their shape during baking. Chill for at least 2 hours.
- Overfilling the tart shells with ganache: Aim for about ¾ full to leave room for toppings and prevent spills.
- Overheating the cream for the ganache: Just bring it to a simmer; boiling can scorch it or make the ganache seize.
How to Store Mini Chocolate Tarts
- Room Temperature: Unfilled tart shells can be stored in an airtight container for up to 2 days.
- Refrigerator: Filled and topped Mini Chocolate Tarts are best stored in an airtight container in the fridge for up to 3 days.
- Freezer: Unfilled tart shells can be frozen for up to 1 month. Thaw at room temperature before filling.
Frequently Asked Questions
Can I make the tart shells ahead of time?
Yes, absolutely! You can make and bake the tart shells up to 2-3 days in advance and store them in an airtight container at room temperature. You can also freeze them for up to a month.
What kind of chocolate is best for the ganache?
I recommend using a good quality dark or semi-sweet chocolate. Aim for something around 60-70% cacao for a rich, balanced flavor. Chocolate chips work, but a chopped bar melts more smoothly.
Can I use a different topping instead of whipped cream?
Of course! These tarts are wonderful with a dusting of cocoa powder, a drizzle of caramel sauce, or even a sprinkle of toasted nuts. Get creative!
Why did my ganache separate or look oily?
This usually happens if the cream was too hot, or if the chocolate wasn’t stirred enough. If it separates, try adding a tiny bit more warm cream, a teaspoon at a time, and stir vigorously until it comes back together.
I hope these Mini Chocolate Tarts bring a little extra joy and sweetness to your day, just like they do for me! They’re such a delightful treat to share with loved ones or to simply enjoy all by yourself. If you give them a try, I’d absolutely love to hear how they turned out in your kitchen!
PrintMini Chocolate Tarts

Elegant and surprisingly easy, these mini tarts feature a buttery crust filled with rich chocolate ganache and topped with fluffy whipped cream.
- Prep Time: 45
- Cook Time: 20
- Total Time: 155
- Yield: 24 tarts
- Category: Dessert
- Method: Baking
- Cuisine: American
- Diet: Vegetarian
Ingredients
- 170 g unsalted butter, softened to room temperature
- 120 g powdered sugar
- 1 large egg, room temperature
- 350 g all-purpose flour
- ½ teaspoon salt
- 300 g dark or semi-sweet chocolate, roughly chopped
- 300 g heavy cream
- 200 g heavy cream or whipping cream
- 20 g powdered sugar
- 1 teaspoon vanilla extract
- fresh strawberries, or other fresh fruits
- 1 tablespoon flaky salt
Instructions
- In a medium bowl, stir together the all-purpose flour and salt. Set aside.
- In a large mixing bowl, beat the softened unsalted butter on medium speed until creamy.
- Add the 120g powdered sugar and beat on low speed to start, then increase to medium speed until fluffy.
- Add the large egg and beat until combined.
- Gradually add the flour mixture and beat on low speed until it forms a soft, crumbly dough.
- Dump the dough out onto a sheet of plastic wrap.
- Use your hands to press the dough together into a flattened disc shape.
- Wrap the dough in plastic wrap.
- Chill the dough in the fridge for at least 2 hours or overnight.
- On a floured surface, roll out the chilled dough to about ⅛" thick.
- Use a round scalloped cookie cutter to cut rounds out of the dough.
- Place a dough round on top of an opening on your muffin pan.
- Slowly and gently push down on the dough with your knuckle until the dough slips down and fills the hole.
- Patch any tears with a small piece of excess dough.
- Repeat with the rest of the dough rounds until the pan is filled.
- Place the whole muffin pan in the fridge to chill for about 30 minutes.
- Preheat the oven to 350°F (175°C).
- Before baking, place muffin liners in each well of the pan, on top of the dough.
- Fill each liner with a few baking weights or uncooked rice.
- Bake for 18-20 minutes or until the edges of the crusts are golden brown.
- Remove the liners and let the tart shells cool in the pan for about 5 minutes.
- Remove the tart shells from the pan and transfer them to a wire rack to cool completely.
- In a heat-safe bowl or measuring cup, add the chopped dark or semi-sweet chocolate.
- Heat the 300g heavy cream on the stovetop or in the microwave until small bubbles start coming to the surface and it just barely starts to simmer.
- Pour the hot cream over the chopped chocolate.
- Set aside untouched for about 3 minutes.
- Stir the chocolate and cream mixture until all the chocolate has melted and it becomes a smooth ganache.
- Let the ganache cool slightly until it has thickened but is still pourable.
- Transfer the ganache to a piping bag and cut off the tip.
- Pipe ganache into each cooled tart shell until about ¾ full.
- In a large mixing bowl, add the 200g heavy cream or whipping cream, 20g powdered sugar, and vanilla extract.
- Use an electric hand mixer to beat on medium speed until it becomes firm peaks.
- Transfer the whipped cream to a piping bag fitted with a large round piping tip.
- Pipe a dollop of whipped cream on top of the tarts.
- Top some tarts with fresh fruits like strawberries.
- Sprinkle other tarts with flaky salt.
Notes
Ensure butter and egg are at room temperature for the best dough consistency.
Don’t skip chilling the dough; it prevents shrinkage and keeps the shells flaky.
Use good quality chocolate for a superior ganache flavor.
Let the ganache cool slightly before piping for easier handling.