Oh, these Lemon Raspberry Bars! They bring back so many happy memories. My grandma used to make a version of these every summer when the raspberries were ripe, and the kitchen would just smell incredible. I’ve tweaked her recipe over the years to make it even easier and packed with flavor, and now they’re a staple at all our family gatherings. There’s just something about that bright lemon with the sweet-tart raspberry that makes everyone smile.
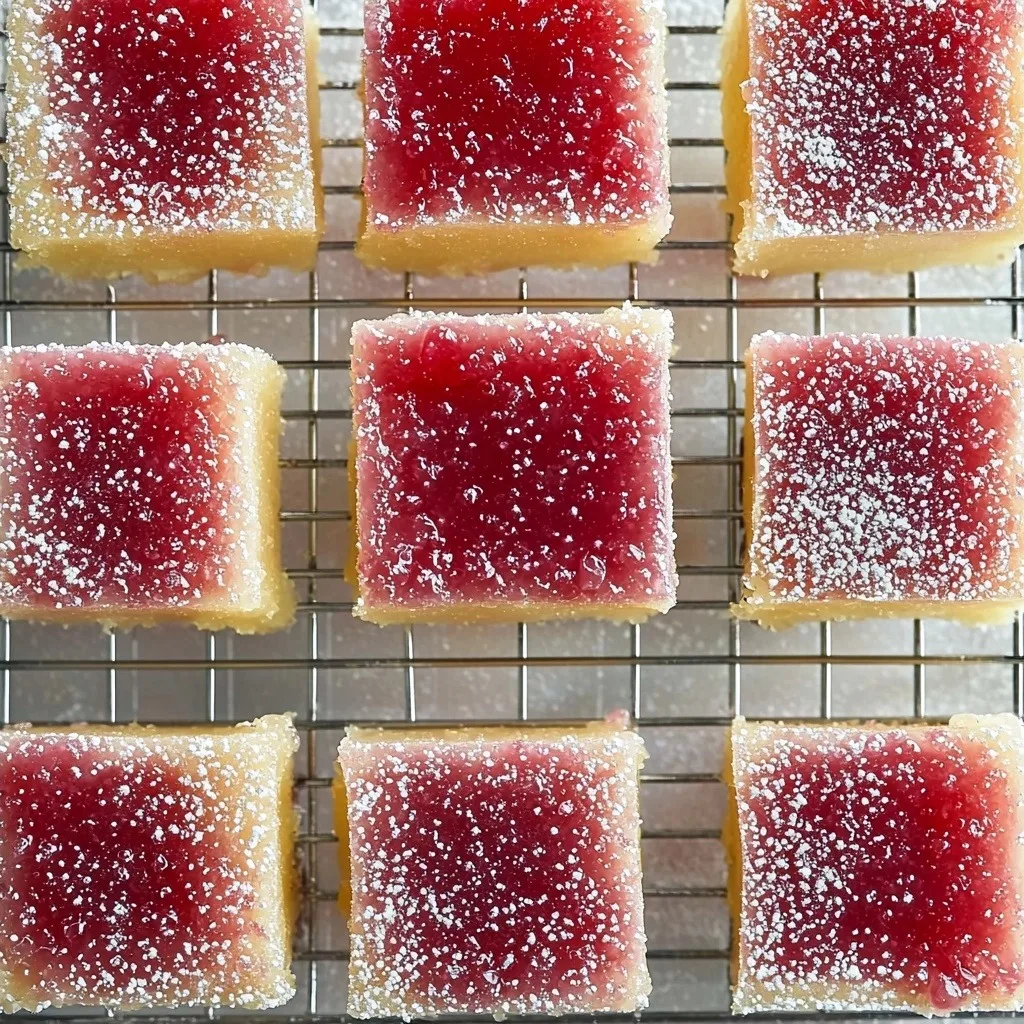
Why You’ll Love These Lemon Raspberry Bars
- They’re bursting with fresh, vibrant lemon and sweet, juicy raspberry flavors – a perfect balance!
- The shortbread base is wonderfully buttery and tender, providing the ideal contrast to the creamy topping.
- You can make these ahead of time, which makes them fantastic for parties, potlucks, or just a delicious treat throughout the week.
- They look absolutely stunning, but they’re surprisingly simple to put together, even for beginner bakers.
Ingredients You’ll Need
- Raspberries: Fresh or frozen works perfectly for the puree. Don’t worry about thawing if they’re frozen!
- All-Purpose Flour: This is the foundation of our lovely shortbread crust. No need for anything fancy here.
- Granulated Sugar: We use it in both the shortbread and the lemon raspberry layer for sweetness.
- Corn Starch: This is our secret weapon for a tender shortbread and a perfectly set, silky smooth lemon layer. It helps prevent the filling from being too runny.
- Unsalted Butter: Melted butter gives our shortbread that rich, melt-in-your-mouth texture. Always use unsalted so you can control the salt level.
- Large Eggs: Eggs are crucial for binding and giving structure to our lemon raspberry filling.
- Lemon Juice: Freshly squeezed is absolutely key here! Bottled lemon juice just won’t give you that bright, zesty flavor we’re going for.
How to Make Lemon Raspberry Bars Step by Step
First things first, let’s get that gorgeous raspberry puree ready. Just pop your raspberries into a blender and give them a good whiz until they’re smooth. Then, if you want that super silky texture, push the puree through a sifter to catch all those tiny seeds. Don’t skip this step if you’re not a fan of seeds!
Next, we’ll gently cook down that seedless puree on the stove until it’s nice and thick – this concentrates all that lovely raspberry flavor. While that’s cooling, you can start on the shortbread base. Whisk together your dry ingredients, then stir in the melted butter. It’ll be thick, but don’t worry! Press it into your prepared pan, making sure to create a little lip around the edges, and pop it into a 325°F (160°C) oven for about 20-25 minutes. You’ll want it to look set and just lightly golden.
While the shortbread is baking, you can whip up the lemon raspberry layer. Whisk sugar and cornstarch together to get rid of any lumps, then add the eggs, your cooled reduced raspberry puree, and finally, the fresh lemon juice. This mixture will be quite liquidy, but that’s exactly what we want! Pour it over the warm, baked shortbread and bake for another 20-25 minutes at the same temperature until it’s set. Once it’s out of the oven, let it cool completely on the counter, then chill it in the fridge for at least two hours. This is where the magic happens and everything sets up beautifully! Slice and enjoy!

My Top Tips for Success
- I always recommend using fresh lemon juice. Trust me, it makes a huge difference in the brightness of the flavor!
- When pressing the shortbread into the pan, really get it as even as possible. This ensures even baking.
- Don’t be afraid to reduce the raspberry puree until it’s quite thick. This concentrates the flavor and prevents a watery filling.
- In my experience, chilling the bars for at least 2 hours (or even overnight!) makes them much easier to slice cleanly.
- For super clean cuts, wipe your knife with a damp cloth after each slice. It’s a little extra step but totally worth it.
Common Mistakes to Avoid
- Not reducing the raspberry puree enough: If your puree is too thin, your lemon raspberry layer might not set as firmly. Keep simmering until it’s noticeably thicker.
- Over-baking the shortbread: Baking it too long can make it dry. You want it just set and slightly golden, not deeply browned.
- Under-chilling the bars: Trying to slice them before they are fully chilled will result in messy, gooey bars. Patience is key here!
- Not making a lip on the shortbread base: This little edge helps contain the liquid filling, preventing it from seeping under the crust.
How to Store Lemon Raspberry Bars
- Refrigerator: Store leftover bars in an airtight container in the refrigerator for up to 5 days.
Frequently Asked Questions
Can I use frozen raspberries for the puree?
Yes, absolutely! Frozen raspberries work perfectly for the puree. There’s no need to thaw them before blending.
Do I have to remove the seeds from the raspberry puree?
Removing the seeds is optional but highly recommended. It gives the lemon raspberry layer a much smoother and more pleasant texture.
Why did my lemon layer not set?
This usually happens if the raspberry puree wasn’t reduced enough, or if the bars weren’t chilled for a sufficient amount of time. Make sure to cook down your puree until it’s thick, and give the bars at least 2 hours in the fridge.
Can I make these bars ahead of time?
Yes, these bars are perfect for making ahead! You can prepare them a day or two in advance and store them in the refrigerator until you’re ready to serve.
I hope these Lemon Raspberry Bars brighten your day and bring a little sunshine to your kitchen, just like they do for me! If you give them a try, I’d absolutely love to hear how they turned out. Happy baking!
PrintLemon Raspberry Bars
Bright and zesty Lemon Raspberry Bars with a buttery shortbread crust and a vibrant, sweet-tart fruit topping. A perfect dessert for any occasion!
- Prep Time: 30
- Cook Time: 45
- Total Time: 255
- Yield: 12-16 servings
- Category: Dessert
- Method: Baking
- Cuisine: American
- Diet: Vegetarian
Ingredients
- 2 cup raspberries (250 grams) fresh or frozen
- 2 1/4 cup all-purpose flour (281 grams)
- 1/2 cup granulated sugar (100 grams)
- 1 tablespoon corn starch
- 1/4 teaspoon salt
- 1 cup unsalted butter (226 grams) melted
- 1 1/2 cups granulated sugar (300 grams)
- 1/3 cup corn starch (40 grams)
- 6 large eggs
- 1/4 cup reduced raspberry puree (60 ml)
- 3/4 cup lemon juice (180 ml) freshly squeezed
Instructions
- Add the raspberries to a blender or food processor.
- Pulse the raspberries until smooth.
- Pour the raspberry puree into a metal sifter.
- Push the puree through the sifter to remove the seeds (optional, but recommended).
- Add the seedless puree to a small saucepan.
- Place the saucepan over low-medium heat.
- Gently boil down the puree to remove excess liquid for about 15-20 minutes.
- Reduce the puree until it is much thicker, yielding about 1/4 – 1/3 cup.
- Remove the reduced puree from the heat.
- Let the reduced puree cool as you prepare the shortbread base.
- Preheat the oven to 325F (160C) degrees.
- Line a 9×13 inch (23×33 cm) baking pan with parchment paper, leaving an overhang around the edges.
- In a medium bowl, whisk together the flour, sugar, corn starch, and salt.
- Stir in the melted butter until well combined.
- The mixture should be quite thick.
- Press the dough evenly into the bottom of the prepared pan.
- Create a slight lip around the edge of the pan with the dough.
- Bake the shortbread base in the preheated oven for 20-25 minutes.
- Bake until the top looks set and slightly golden.
- While the shortbread bakes, make the lemon raspberry layer.
- Remove the shortbread from the oven once baked.
- Gently prick the very top of the shortbread using a fork (do not prick all the way to the bottom).
- In a large bowl, whisk together 1 1/2 cups granulated sugar and 1/3 cup cornstarch to remove any lumps.
- Whisk in the 6 large eggs until combined.
- Whisk in the cooled 1/4 cup of reduced raspberry puree.
- Carefully whisk in the 3/4 cup lemon juice until combined.
- The mixture will be quite liquidy.
- Pour the lemon raspberry mixture evenly over the baked shortbread base.
- Bake in the oven (still at 325F/160C) for 20-25 minutes.
- Bake until the top of the lemon raspberry layer looks set.
- Remove the bars from the oven.
- Cool the bars in the pan for at least 1 hour or until they reach room temperature.
- Cover the pan and place it in the fridge to chill for at least 2 hours.
- When ready to slice, lift the bars out of the pan using the parchment paper overhang.
- Place the bars on a cutting board.
- Slice the bars with a sharp knife.
- Wipe off the knife after each cut for clean slices.
- Store the bars in the fridge.
Notes
Always use freshly squeezed lemon juice for the best flavor.
Ensure the raspberry puree is reduced sufficiently to prevent a watery filling.
Chill the bars thoroughly for at least 2 hours before slicing for clean cuts.
Wipe your knife with a damp cloth between each slice for a professional finish.