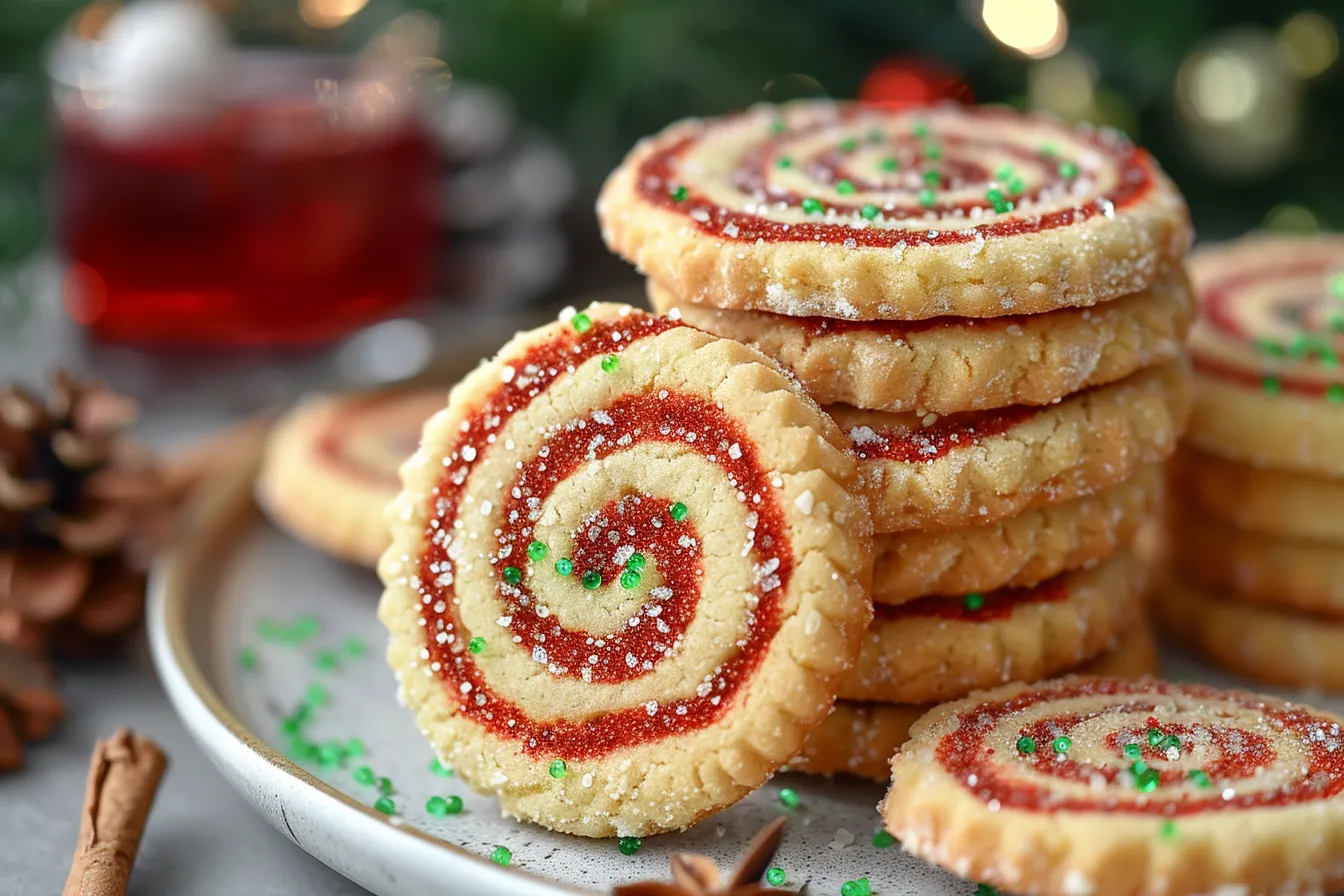
Christmas is synonymous with baking, and nothing quite captures the festive spirit like Christmas Pinwheel Cookies. These delightful treats, with their eye-catching spirals of red and green, aren’t just visually stunning; they’re melt-in-your-mouth delicious. This year, ditch the same old sugar cookie recipe and embark on a baking adventure that’s both fun and rewarding. Imagine the smiles as you present a platter of these vibrant cookies, each a miniature work of art.
My grandma, a true baking enthusiast, passed down this recipe. I’ve spent years perfecting it, ensuring the dough is easy to work with and the colors stay vibrant even after baking. There’s something magical about transforming simple ingredients into a beautiful and delicious creation. Plus, with the popularity of visually appealing recipes on platforms like Instagram and Pinterest, these cookies are guaranteed to be a hit this holiday season. So, grab your apron, preheat your oven, and let’s get swirling!
These Christmas Pinwheel Cookies aren’t just a treat; they’re a tradition in the making. They offer a fantastic opportunity to involve kids in the kitchen, creating memories that will last a lifetime. Let’s explore the simple steps that bring these festive spirals to life, transforming your kitchen into a Christmas wonderland, one cookie at a time.
Ingredients: Your Palette for Festive Flavors
The beauty of Christmas Pinwheel Cookies lies in their simplicity. With a handful of common ingredients, you can create a stunning visual treat that tastes just as good as it looks. Here’s what you’ll need:
- All-Purpose Flour: 3 cups. Provides the structure for our cookies. For a slightly softer cookie, you can substitute ¼ cup of cake flour. The protein in flour develops gluten, contributing to the cookie’s texture.
- Unsalted Butter: 1 cup (2 sticks), softened. Butter adds richness, flavor, and tenderness. Ensure it’s properly softened for easy creaming. Don’t substitute with margarine as it can affect the cookie’s texture and flavor.
- Granulated Sugar: 1 cup. Sweetens the cookies and contributes to their crisp edges.
- Eggs: 2 large. Bind the ingredients together and add moisture. Use room-temperature eggs for better emulsification.
- Vanilla Extract: 1 teaspoon. Enhances the flavor of the cookies. A good quality vanilla extract makes all the difference.
- Baking Powder: 1 teaspoon. Helps the cookies rise and become light.
- Salt: ½ teaspoon. Balances the sweetness and enhances the other flavors.
- Red and Green Food Coloring: Gel food coloring is recommended for vibrant colors and minimal liquid addition. Liquid food coloring can change the dough consistency.
Ingredient Science: The combination of butter and sugar creates air pockets during creaming, leading to a tender cookie. Baking powder provides lift, while the salt balances the sweetness and enhances the other flavors. Using gel food coloring ensures vibrant colors without altering the dough’s consistency.
Substitution Tips: For a gluten-free version, use a 1:1 gluten-free all-purpose flour blend. For a vegan option, substitute butter with a vegan butter alternative and eggs with flax eggs (1 tablespoon ground flaxseed mixed with 3 tablespoons water per egg).
Expert Tips for Perfect Pinwheels
Achieving those perfect swirls and preventing color bleeding can seem tricky, but with these expert tips, you’ll be a pinwheel pro in no time:
- Chill Time is Crucial: Don’t skip the chilling steps! Cold dough is much easier to work with and prevents the cookies from spreading too much during baking. I recommend chilling the dough for at least 2 hours, or even overnight.
- Roll Evenly: Aim for an even thickness when rolling out the dough. This ensures that the cookies bake uniformly. Use a rolling pin with guides for consistent results.
- Prevent Color Bleeding: To prevent the red and green colors from bleeding into each other, avoid overmixing the dough after adding the food coloring. Also, make sure the colored doughs are properly chilled before rolling them together.
- Sharp Knife, Clean Cuts: Use a sharp knife or a pizza cutter to slice the rolled dough. This will give you clean, defined swirls. Wipe the blade clean between each cut to prevent color mixing.
- Baking Sheet Prep: Line your baking sheets with parchment paper or silicone baking mats to prevent the cookies from sticking and ensure even baking.
- Don’t Overbake: Overbaked cookies will be dry and crumbly. Bake until the edges are lightly golden brown. The centers should still be slightly soft.
- Test Batch: Always bake a test batch of one or two cookies to ensure your oven temperature is accurate and adjust baking time as needed.
My Testing Notes: I’ve found that using a slightly damp paper towel to gently moisten the dough before rolling helps the layers adhere better. Also, don’t be afraid to experiment with different flavorings! A touch of almond extract in the vanilla dough or peppermint extract in the green dough can add a festive twist.
Pro Insights: For extra shine, brush the tops of the cookies with a light egg wash (1 egg white whisked with 1 tablespoon water) before baking. This will give them a beautiful glossy finish.
Storage Substitutions
Proper storage keeps your Christmas Pinwheel Cookies fresh and delicious. These cookies also lend themselves well to a few clever substitutions.
Storage:
- Room Temperature: Store baked cookies in an airtight container at room temperature for up to 5 days.
- Freezing: Freeze baked cookies for up to 2 months. Thaw completely at room temperature before serving. You can also freeze the unbaked cookie dough logs for up to 3 months. Thaw in the refrigerator overnight before slicing and baking.
Substitutions:
- Flour: As mentioned earlier, use a 1:1 gluten-free all-purpose flour blend for a gluten-free version.
- Butter: Substitute with a vegan butter alternative for a vegan option.
- Eggs: Use flax eggs (1 tablespoon ground flaxseed mixed with 3 tablespoons water per egg) as an egg substitute.
- Sugar: While granulated sugar is preferred for its texture, you can use cane sugar or coconut sugar as a substitute. Keep in mind that these substitutions may slightly alter the cookie’s flavor and texture.
- Food Coloring: Natural food colorings, like beet juice for red and spinach juice for green, can be used, but the colors may not be as vibrant.
FAQ: Your Burning Pinwheel Cookie Questions Answered
Why are my cookies spreading too much?
This is usually due to the dough being too warm or the oven temperature being too low. Make sure your butter is properly softened, not melted, and chill the dough for the recommended time. Also, verify that your oven is accurately preheated.
How can I prevent the colors from bleeding?
Avoid overmixing the dough after adding the food coloring. Overmixing can cause the colors to blend together. Also, ensure the colored doughs are properly chilled before rolling them together.
Can I make the dough ahead of time?
Absolutely! The dough can be made ahead of time and stored in the refrigerator for up to 2 days or frozen for up to 3 months. Just make sure to wrap it tightly in plastic wrap to prevent it from drying out.
What if I don’t have gel food coloring?
While gel food coloring is recommended for vibrant colors, you can use liquid food coloring. However, be mindful that liquid food coloring can change the dough’s consistency. Add it sparingly and adjust the amount of flour if needed.
Can I add different flavorings to the dough?
Yes, you can! Experiment with different extracts, such as almond, peppermint, or lemon. You can also add spices like cinnamon, nutmeg, or ginger for a festive twist. Just be sure to add them in small amounts to avoid overpowering the other flavors.
Why are my cookies dry and crumbly?
This is usually a sign of overbaking. Bake the cookies until the edges are lightly golden brown, but the centers are still slightly soft. Also, make sure you’re not overmeasuring the flour. Spoon and level the flour into your measuring cup instead of scooping it directly from the container.
Can I use a different type of flour?
While all-purpose flour is the standard for this recipe, you can experiment with other types of flour. Cake flour will result in a softer cookie, while bread flour will create a chewier texture. If using a different type of flour, you may need to adjust the amount of liquid in the recipe.
Spread the Holiday Cheer with Homemade Cookies
Christmas Pinwheel Cookies are more than just a delicious treat; they’re a symbol of holiday joy and creativity. This recipe offers a delightful way to share the spirit of the season with loved ones. From the mesmerizing swirls to the irresistible flavor, these cookies are sure to be a crowd-pleaser at any holiday gathering.
So, go ahead and bake a batch of these festive delights. Share them with your friends, family, and neighbors, and watch their faces light up with holiday cheer. Don’t forget to snap some photos and tag me in your creations! I’d love to see your pinwheel masterpieces.
PrintChristmas Pinwheel Cookies

Easy Christmas Pinwheel Cookies Add festive cheer to your holiday with this simple recipe Delicious and fun to make Try it today
- Prep Time: 30 minutes
- Cook Time: 10 minutes
- Total Time: 2 hours 40 minutes
- Yield: 48
- Category: Cookie
- Cuisine: Christmas
Ingredients
- 3 cups All-Purpose Flour
- 1 cup (2 sticks) Unsalted Butter, softened
- 1 cup Granulated Sugar
- 2 large Eggs
- 1 teaspoon Vanilla Extract
- 1 teaspoon Baking Powder
- ½ teaspoon Salt
- Red and Green Gel Food Coloring
Instructions
- Combine butter and sugar until light and fluffy.
- Add eggs and vanilla extract, and mix well.
- In a separate bowl, whisk together flour, baking powder, and salt.
- Gradually add the dry ingredients to the wet ingredients, mixing until just combined.
- Divide the dough in half. Color one half red and the other half green using gel food coloring.
- Wrap each dough in plastic wrap and chill for at least 2 hours, or overnight.
- On a lightly floured surface, roll each dough into a rectangle of equal size and thickness.
- Place one rectangle on top of the other and gently roll them together into a tight log.
- Wrap the log in plastic wrap and chill for at least 1 hour.
- Preheat oven to 375°F (190°C). Line baking sheets with parchment paper.
- Slice the log into ¼-inch thick cookies and place them on the prepared baking sheets.
- Bake for 8-10 minutes, or until the edges are lightly golden brown.
- Let cool on the baking sheets for a few minutes before transferring to a wire rack to cool completely.