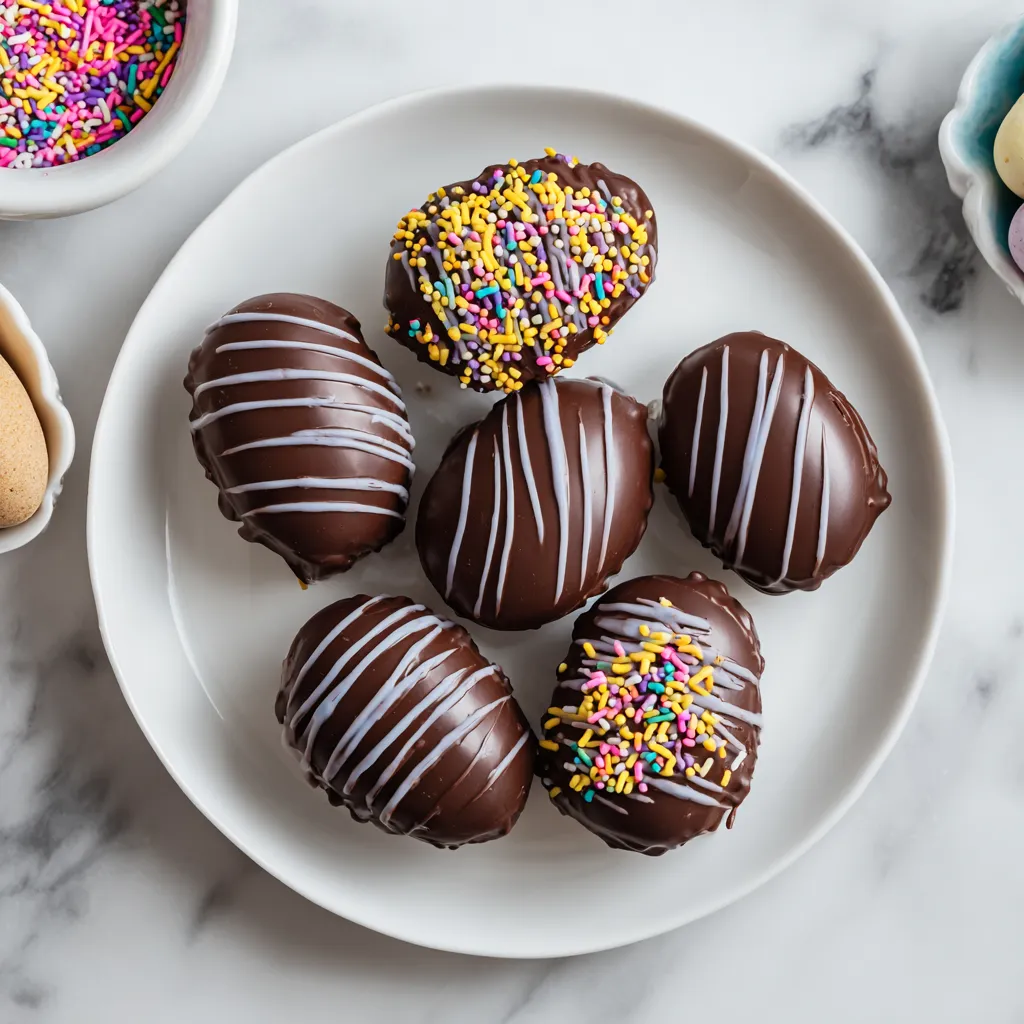
Oh, prepare yourselves for an Easter treat that’s truly something special! These Chocolate-Covered Easter Eggs aren’t just candies; they’re little bites of springtime joy, handmade with love and bursting with delightful flavors. Imagine a soft, creamy center, perhaps vanilla or peanut butter, infused with just the right amount of sweetness, then enrobed in a crisp, luxurious shell of premium chocolate. Each bite offers a harmonious contrast – the smooth, melt-in-your-mouth filling giving way to the satisfying snap of rich chocolate. They’re beautifully customizable, making them perfect for gifting, decorating, or simply indulging in a moment of pure bliss. Seriously, these are so much better than anything you’ll find in a store!
Why We Love This Chocolate-Covered Easter Eggs
There’s something truly magical about homemade Chocolate-Covered Easter Eggs that sets them apart from anything you can buy. The unique quality lies in the ability to completely customize the filling – from classic vanilla buttercream to rich peanut butter, coconut, or even a hint of mint. This allows for a depth of flavor and a freshness that store-bought versions simply can’t replicate. Each egg becomes a tiny, personalized masterpiece, reflecting the thoughtfulness and care put into its creation, making them incredibly special for holiday gatherings.
The flavor profile is incredibly versatile, but consistently delightful. Imagine a sweet, velvety smooth interior that gently melts on your tongue, perfectly complemented by the slightly bitter, snappy embrace of high-quality dark chocolate, or the creamy sweetness of milk chocolate. The texture contrast is divine: the yielding, tender filling against the firm, crisp chocolate shell. It’s this multi-layered sensory experience that makes these eggs utterly irresistible, providing a more complex and satisfying experience than the often-one-note store-bought varieties.
What makes these better than other versions is the control over ingredients. Using premium chocolate and fresh, good-quality butter and sugar for the filling elevates them from a simple candy to a gourmet treat. Plus, the joy of decorating them yourself adds a personal touch that makes them ideal for Easter baskets, dessert platters, or as thoughtful gifts for friends and family. They’re not just a dessert; they’re an experience, perfect for celebrating the arrival of spring and the joy of the holiday season.
An Unforgettable Experience for Your Taste Buds
Get ready for a treat that transcends mere confectionery; these Chocolate-Covered Easter Eggs are an absolute sensory explosion! The moment you lift one to your nose, you’re greeted by the rich, alluring aroma of fine chocolate, perhaps intertwined with a hint of vanilla or the nutty warmth of peanut butter. Visually, they are miniature works of art, glossy and smooth, often adorned with delicate sprinkles or intricate drizzles, promising an indulgence before the first bite even touches your lips. They invite you to savor every detail, from wrapper to decadent finish.
The first bite is nothing short of pure bliss. There’s that immediate, satisfying “snap” as your teeth break through the tempered chocolate shell, a sound that signals luxury and quality. This gives way to the incredibly smooth, almost ethereal creaminess of the filling, which melts slowly and sensuously on your tongue. Whether it’s a luscious vanilla fondant or a rich, decadent peanut butter, the texture is paramount – soft, yielding, and profoundly comforting, a perfect counterpoint to the firm exterior. It’s the kind of texture that demands a slow, deliberate enjoyment.
People simply can’t resist these because they embody homemade warmth and artisanal craftsmanship. They’re a nostalgic nod to simpler times, yet with a gourmet twist. Perfect for any spring celebration, from Easter brunch to a casual family gathering, they elevate any dessert spread. Serve them on a beautiful platter, maybe alongside some fresh berries, to truly showcase their charming appeal. Each egg is a memorable moment, a delicious testament to the joy of holiday baking and the sheer pleasure of indulgent treats.
Use High Quality Ingredients for Chocolate-Covered Easter Eggs
When it comes to crafting truly exceptional Chocolate-Covered Easter Eggs, the quality of your ingredients isn’t just important—it’s paramount. Using premium components elevates these humble candies from good to absolutely extraordinary, ensuring every bite is a luxurious experience. Think of it this way: good chocolate melts smoothly and offers a complex flavor profile, while inferior chocolate can be waxy and bland. Similarly, fresh butter and pure vanilla extract make all the difference in achieving a rich, nuanced filling that truly shines.
Premium ingredients bring an undeniable depth and richness to the dish. For example, opting for a high-quality couverture chocolate (chocolate with a high percentage of cocoa butter) will result in a beautifully glossy, crisp shell that melts perfectly in your mouth, carrying intense cocoa notes. Good quality unsalted butter in your filling contributes to a silkier texture and a richer mouthfeel, avoiding any greasy residue. Even your choice of powdered sugar matters, as finely milled sugar creates a smoother, less gritty filling. These small upgrades translate into a significantly more enjoyable and professional-tasting result.
What makes this recipe special is the synergy created by superior components working together. For the filling, use real vanilla bean paste or pure vanilla extract, not imitation, for that authentic, sweet aroma. If making peanut butter eggs, choose a natural, creamy peanut butter without added sugars or oils to let the pure peanut flavor come through. Always opt for fresh eggs (if your recipe calls for them, though many fondant fillings don’t) and full-fat dairy if applicable. Selecting the best ingredients means treating yourself and your loved ones to a confection that tastes as delightful as it looks, truly making it a standout Easter treat.
Chocolate-Covered Easter Eggs Recipe
- Powdered Sugar
- Unsalted Butter
- Vanilla Extract
- Salt
- Cream Cheese
- Peanut Butter
- Coconut Flakes
- Semisweet Chocolate Chips
- Milk Chocolate Chips
- Vegetable Shortening
- Parchment Paper
- Sprinkles
Chocolate Drizzle and Decorations
- White Chocolate Chips
- Food Coloring
- Candy Melts
- Decorative Sprinkles
- Small Candies
- Edible Glitter
Instructions
How to Make The Best Chocolate-Covered Easter Eggs with Drizzle!
First things first, let’s get those delicious fillings ready! In a large mixing bowl, combine your softened unsalted butter with powdered sugar, vanilla extract, and a tiny pinch of salt. Beat this mixture with an electric mixer until it’s light, fluffy, and incredibly smooth. This is your base fondant. If you’re making peanut butter eggs, divide this base; to one half, add creamy peanut butter and beat until fully combined and smooth. For coconut eggs, fold in finely shredded coconut flakes. For a simple vanilla cream, leave it as is or add a little extra vanilla. The mixture should be firm enough to handle but soft enough to shape. Once your fillings are ready, it’s time to get shaping! Take small portions (about 1-2 tablespoons) of each filling and gently roll them between your palms into egg shapes. Aim for uniform size for a beautiful presentation. Place these shaped eggs onto a baking sheet lined with parchment paper. Pop them into the refrigerator or freezer for at least 30 minutes. This chilling step is absolutely crucial – it ensures the eggs are firm enough to dip without falling apart, preventing common mistakes like crumbling or melting into the warm chocolate. While they chill, you can prepare your chocolate for dipping, making sure everything is ready for the next exciting stage.
How to Make the Chocolate Drizzle
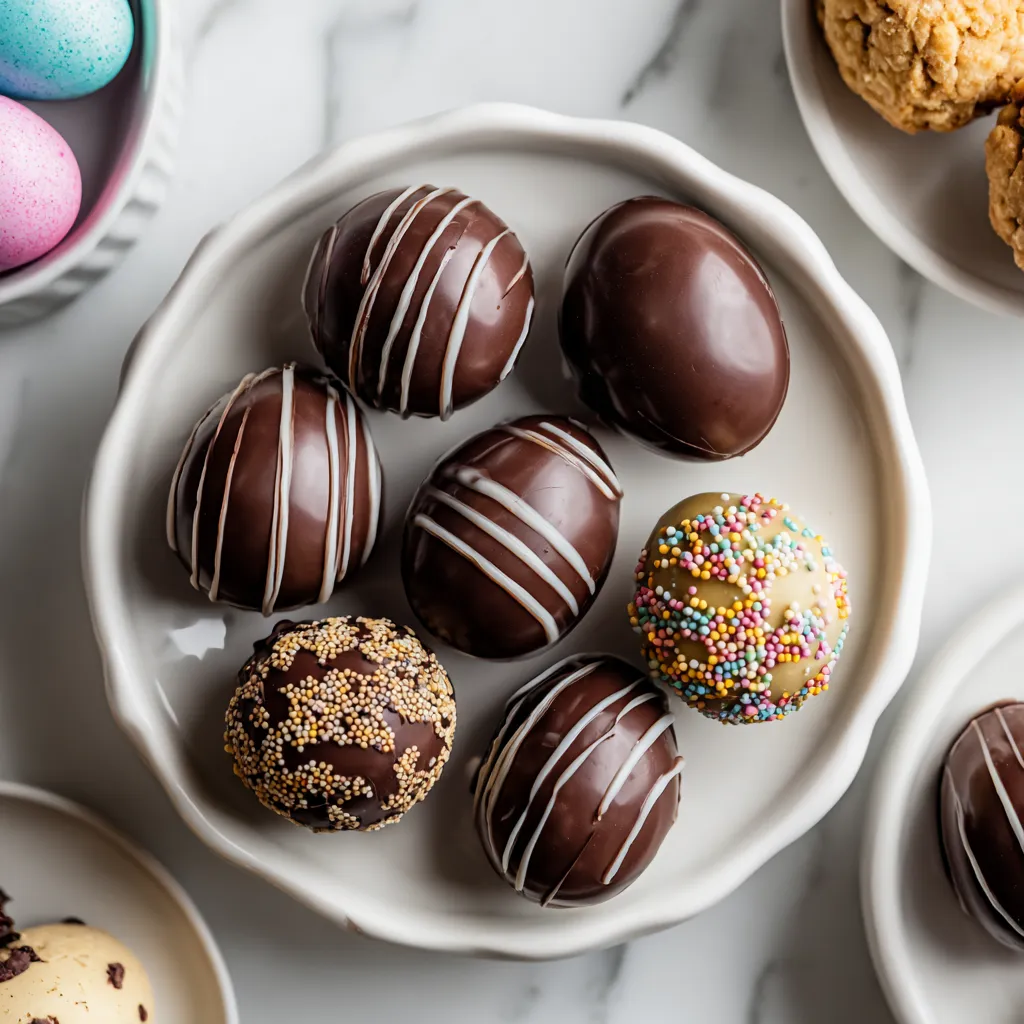
Once your chocolate-covered eggs are set, it’s time to add that extra special touch with a dazzling drizzle! Melt your white chocolate chips (or colored candy melts) in a microwave-safe bowl in 30-second intervals, stirring well after each, until completely smooth and fluid. If you want colored drizzles, stir in a few drops of gel food coloring until you achieve your desired hue. Transfer the melted chocolate to a piping bag with a very small snip in the corner, or simply use a fork. Hold the bag (or fork) a few inches above the cooled, chocolate-dipped eggs and move it back and forth in quick, sweeping motions to create delicate, artistic lines. The contrast in color and the fine lines add delightful visual appeal and a professional finish, making each egg look like a gourmet creation.
Dip the Chocolate-Covered Easter Eggs
Now for the most satisfying part: coating your perfectly chilled eggs! In a heatproof bowl set over a saucepan of simmering water (or in the microwave in 30-second bursts), melt your desired chocolate chips – semisweet, milk, or a combination – with a teaspoon of vegetable shortening. The shortening helps create a smoother, thinner chocolate that’s easier to dip and sets with a lovely shine. Stir until completely smooth and glorious. Using a dipping fork or two regular forks, carefully submerge one chilled egg at a time into the melted chocolate. Ensure it’s fully coated, then gently tap the fork against the side of the bowl to allow any excess chocolate to drip off, preventing puddles. Carefully transfer the coated egg back to the parchment-lined baking sheet. Before the chocolate fully sets, if desired, sprinkle with your favorite festive toppers like colorful sprinkles or finely chopped nuts. The goal is a thin, even coating that beautifully encases the creamy center, creating a stunning visual and textual contrast. Repeat with the remaining eggs, working efficiently so the eggs stay cold and the chocolate remains at dipping consistency. Allow them to set completely at room temperature or in the refrigerator.
More Festive Decorating Ideas!
Get creative with your Easter egg decorations! Beyond simple drizzles and sprinkles, consider piping intricate designs with contrasting white or colored chocolate, like tiny polka dots, zigzags, or delicate floral patterns. For a truly elegant touch, use edible pearl dust or gold luster dust brushed onto the set chocolate for a shimmery, sophisticated finish. You can also press small, edible sugar flowers or tiny candy pearls onto the chocolate before it sets for a delicate, whimsical look. Think about seasonal color schemes: pastel blues, pinks, yellows, and mint greens are perfect for spring. For a fun, playful vibe, dip the bottom half in one color, the top in another, and use a thin line of frosting to create a “seam.” Or, for a textured finish, roll the still-wet chocolate eggs in finely chopped toasted nuts or coconut flakes. The possibilities are endless when it comes to making your eggs utterly unique and festive!
Storing Chocolate-Covered Easter Eggs
To keep your beautiful Chocolate-Covered Easter Eggs tasting their best, proper storage is key. If your home is cool (below 70°F or 21°C) and not too humid, they can be stored in an airtight container at room temperature for up to 3-4 days. However, for fillings that contain dairy or are more delicate, refrigeration is highly recommended. Place them in a single layer in an airtight container between sheets of parchment paper to prevent sticking and condensation. They’ll stay fresh in the refrigerator for up to 2 weeks. If you want to enjoy them for longer, these eggs freeze beautifully! Wrap each egg individually in plastic wrap, then place them in an airtight, freezer-safe container. They can be frozen for up to 2-3 months. To enjoy, simply thaw them overnight in the refrigerator, then bring them to room temperature for about 30 minutes before serving to ensure the best texture and flavor. This meticulous storage ensures that the chocolate remains snappy and the filling stays soft and delicious.
PrintChocolate-Covered Easter Eggs Recipe

Easy Chocolate-Covered Easter Eggs: Master this sweet treat for a delightful holiday. Make yours today!
- Prep Time: 1 hour 30 minutes
- Cook Time: 20 minutes
- Total Time: 1 hour 50 minutes
- Yield: 24 servings
- Category: Dessert
- Cuisine: American
Ingredients
- 500 grams Powdered Sugar
- 113 grams Unsalted Butter, softened
- 1 teaspoon Vanilla Extract
- 1 pinch Salt
- 50 grams Cream Cheese, softened (optional, for some fillings)
- 60 grams Peanut Butter (optional, for some fillings)
- 50 grams Coconut Flakes (optional, for some fillings)
- 200 grams Semisweet Chocolate Chips
- 200 grams Milk Chocolate Chips
- 1 teaspoon Vegetable Shortening
- 100 grams White Chocolate Chips
- 1 drop Food Coloring (optional)
- 50 grams Candy Melts (optional)
- as needed Decorative Sprinkles
- as needed Small Candies
- as needed Edible Glitter
Instructions
- In a large mixing bowl, combine your softened unsalted butter with powdered sugar, vanilla extract, and a tiny pinch of salt. Beat this mixture with an electric mixer until it’s light, fluffy, and incredibly smooth. This is your base fondant. If you’re making peanut butter eggs, divide this base; to one half, add creamy peanut butter and beat until fully combined and smooth. For coconut eggs, fold in finely shredded coconut flakes. For a simple vanilla cream, leave it as is or add a little extra vanilla. The mixture should be firm enough to handle but soft enough to shape.
- Take small portions (about 1-2 tablespoons) of each filling and gently roll them between your palms into egg shapes. Aim for uniform size for a beautiful presentation. Place these shaped eggs onto a baking sheet lined with parchment paper. Pop them into the refrigerator or freezer for at least 30 minutes. This chilling step is absolutely crucial – it ensures the eggs are firm enough to dip without falling apart, preventing common mistakes like crumbling or melting into the warm chocolate. While they chill, you can prepare your chocolate for dipping, making sure everything is ready for the next exciting stage.
- In a heatproof bowl set over a saucepan of simmering water (or in the microwave in 30-second bursts), melt your desired chocolate chips – semisweet, milk, or a combination – with a teaspoon of vegetable shortening. The shortening helps create a smoother, thinner chocolate that’s easier to dip and sets with a lovely shine. Stir until completely smooth and glorious. Using a dipping fork or two regular forks, carefully submerse one chilled egg at a time into the melted chocolate. Ensure it’s fully coated, then gently tap the fork against the side of the bowl to allow any excess chocolate to drip off, preventing puddles. Carefully transfer the coated egg back to the parchment-lined baking sheet. Before the chocolate fully sets, if desired, sprinkle with your favorite festive toppers like colorful sprinkles or finely chopped nuts. The goal is a thin, even coating that beautifully encases the creamy center, creating a stunning visual and textual contrast. Repeat with the remaining eggs, working efficiently so the eggs stay cold and the chocolate remains at dipping consistency. Allow them to set completely at room temperature or in the refrigerator.
- Once your chocolate-covered eggs are set, it’s time to add that extra special touch with a dazzling drizzle! Melt your white chocolate chips (or colored candy melts) in a microwave-safe bowl in 30-second intervals, stirring well after each, until completely smooth and fluid. If you want colored drizzles, stir in a few drops of gel food coloring until you achieve your desired hue. Transfer the melted chocolate to a piping bag with a very small snip in the corner, or simply use a fork. Hold the bag (or fork) a few inches above the cooled, chocolate-dipped eggs and move it back and forth in quick, sweeping motions to create delicate, artistic lines. The contrast in color and the fine lines add delightful visual appeal and a professional finish, making each egg look like a gourmet creation.
- Get creative with your Easter egg decorations! Beyond simple drizzles and sprinkles, consider piping intricate designs with contrasting white or colored chocolate, like tiny polka dots, zigzags, or delicate floral patterns. For a truly elegant touch, use edible pearl dust or gold luster dust brushed onto the set chocolate for a shimmery, sophisticated finish. You can also press small, edible sugar flowers or tiny candy pearls onto the chocolate before it sets for a delicate, whimsical look. Think about seasonal color schemes: pastel blues, pinks, yellows, and mint greens are perfect for spring. For a fun, playful vibe, dip the bottom half in one color, the top in another, and use a thin line of frosting to create a ‘seam.’ Or, for a textured finish, roll the still-wet chocolate eggs in finely chopped toasted nuts or coconut flakes. The possibilities are endless when it comes to making your eggs utterly unique and festive!
- To keep your beautiful Chocolate-Covered Easter Eggs tasting their best, proper storage is key. If your home is cool (below 70°F or 21°C) and not too humid, they can be stored in an airtight container at room temperature for up to 3-4 days. However, for fillings that contain dairy or are more delicate, refrigeration is highly recommended. Place them in a single layer in an airtight container between sheets of parchment paper to prevent sticking and condensation. They’ll stay fresh in the refrigerator for up to 2 weeks. If you want to enjoy them for longer, these eggs freeze beautifully! Wrap each egg individually in plastic wrap, then place them in an airtight, freezer-safe container. They can be frozen for up to 2-3 months. To enjoy, simply thaw them overnight in the refrigerator, then bring them to room temperature for about 30 minutes before serving to ensure the best texture and flavor. This meticulous storage ensures that the chocolate remains snappy and the filling stays soft and delicious.
Notes
These Chocolate-Covered Easter Eggs aren’t just candies; they’re little bites of springtime joy, handmade with love and bursting with delightful flavors. Imagine a soft, creamy center, perhaps vanilla or peanut butter, infused with just the right amount of sweetness, then enrobed in a crisp, luxurious shell of premium chocolate. Each bite offers a harmonious contrast – the smooth, melt-in-your-mouth filling giving way to the satisfying snap of rich chocolate. They’re beautifully customizable, making them perfect for gifting, decorating, or simply indulging in a moment of pure bliss.