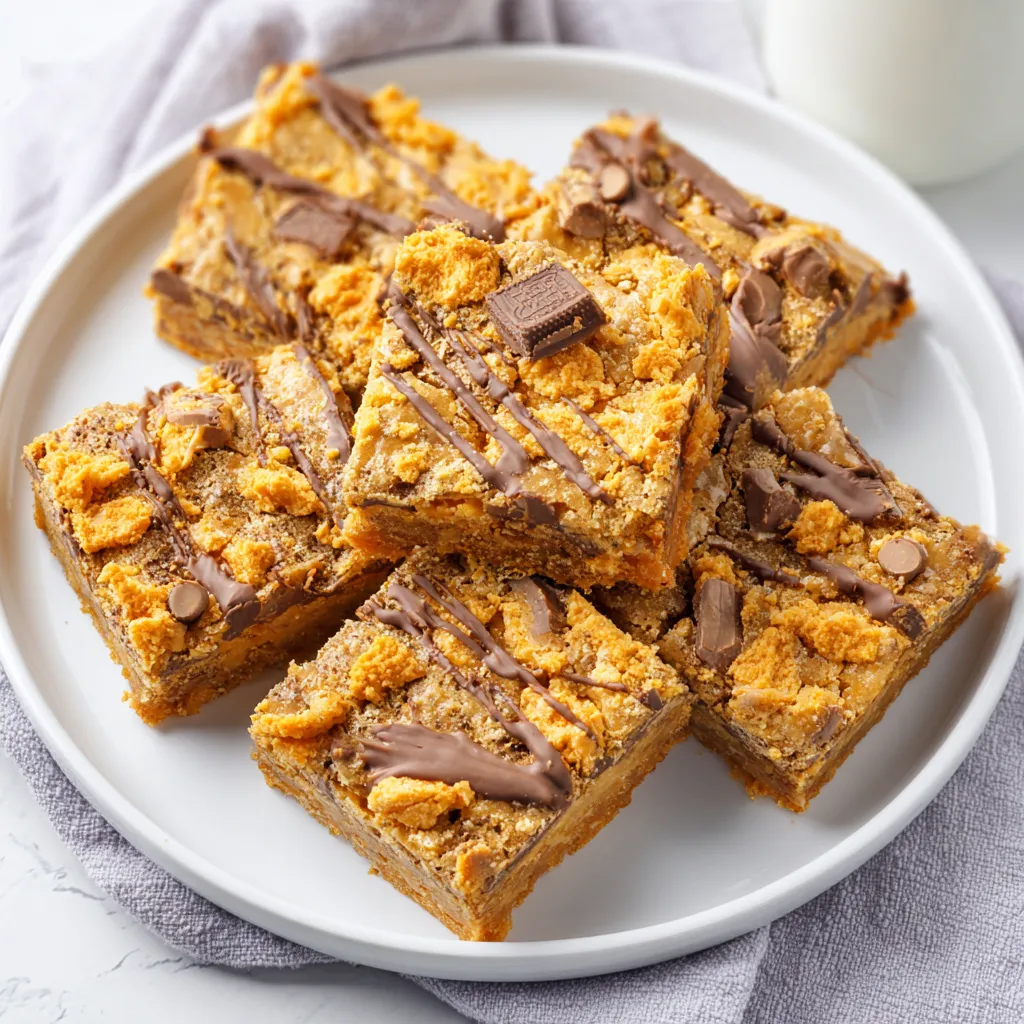
Prepare yourselves for an explosion of flavor and texture with these truly irresistible Butterfinger Cookie Bars! Imagine a thick, chewy, golden-brown cookie base, studded generously with crunchy Butterfinger candy pieces and rich chocolate chips, all melded together in perfect harmony. These bars aren’t just a dessert; they’re an experience – a symphony of sweet, salty, and undeniably satisfying crunch that will leave you craving more after every bite. They’re incredibly easy to whip up, making them the ultimate crowd-plepleaser for any occasion, promising smiles and satisfied sighs all around.
Why We Love This Butterfinger Cookie Bars
What sets these Butterfinger Cookie Bars apart isn’t just the iconic candy inside, but the meticulous balance of textures and flavors that create pure dessert magic. The foundation is a gloriously soft yet perfectly chewy cookie bar, a recipe perfected to hold its shape while providing that comforting, melt-in-your-mouth experience we all crave. It’s the ideal canvas for the star of the show: those wondrously crunchy, peanut-buttery Butterfinger bits that shatter delightfully with every chew, creating an unexpected dance of textures.
Unlike other cookie bar recipes that can sometimes be dry or overly crumbly, our version boasts an incredible moistness and richness, thanks to a careful selection of ingredients and precise baking techniques. We’ve enhanced the classic cookie dough with hints of vanilla and brown sugar, deepening its flavor profile to complement the bold taste of Butterfinger without overwhelming it. The addition of chocolate chips isn’t just an afterthought; they melt into gooey pockets, adding another layer of indulgence and a delightful bitterness that cuts through the sweetness beautifully.
These bars are undeniably better than any store-bought alternative because they offer that homemade warmth and freshness you simply can’t replicate. Each bar is generously loaded, ensuring every single bite delivers a substantial amount of that beloved Butterfinger crunch and sweet chocolate goodness. They’re perfect for casual get-togethers, potlucks, bake sales, or simply as a comforting treat to enjoy with a cup of coffee on a lazy afternoon. They disappear fast, a true testament to their irresistible charm!
Get ready for a dessert that’s not just over the top, but sends your taste buds on an exhilarating rollercoaster of pure confectionary delight! These Butterfinger Cookie Bars are a masterpiece of sensory indulgence, designed to be an unforgettable treat. From the moment they emerge from the oven, their aroma fills the kitchen, a warm, sweet invitation of browned butter, vanilla, and roasted peanuts that promises something extraordinary.
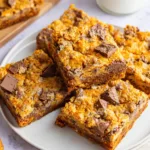
Visually, they are a feast, with their golden-brown edges giving way to a soft, inviting interior speckled with vibrant orange and brown Butterfinger shards and glistening pools of melted chocolate chips. Each bite is a multi-textured marvel: first, the tender give of the chewy cookie base, followed by the exhilarating, almost explosive crunch of the Butterfinger pieces. It’s a playful contrast that keeps your palate engaged, providing both comfort and excitement in every mouthful. The flavor journey is equally captivating, a harmonious blend of sweet, salty, and nutty notes, with the deep, cocoa richness of the chocolate chips adding a final perfect flourish.
People simply can’t resist these bars because they tap into a universal love for classic flavors elevated to new heights. They evoke nostalgia with the familiar taste of Butterfinger, yet present it in a sophisticated, homemade package. They’re perfect for brightening up a gloomy day, celebrating a small triumph, or making any gathering feel a little more special. Serve them slightly warm with a scoop of vanilla ice cream for an extra dose of decadence, or enjoy them as is with a glass of cold milk – either way, they are guaranteed to be the star of the show and leave a lasting, delicious impression.
Use High Quality Ingredients for Butterfinger Cookie Bars
The secret to truly exceptional Butterfinger Cookie Bars, like any sublime culinary creation, lies in the quality of your ingredients. While it might seem like a simple cookie bar, each component plays a crucial role in creating that desirable chewy texture, rich flavor, and captivating aroma. Opting for high-quality ingredients isn’t just a recommendation; it’s an investment in the final taste and experience. Superior ingredients contribute deeper, more nuanced flavors and often result in a more consistent and appealing texture that sets your bars apart.
For these bars, specific ingredient callouts make a significant difference. Start with real butter – unsalted, European-style if you can find it. Its higher fat content will yield a richer, more tender crumb and a more luxurious flavor than cheaper alternatives. Don’t skimp on the vanilla extract; pure vanilla extract, not imitation, infuses the dough with warmth and depth that synthetic versions simply can’t replicate. When it comes to chocolate chips, choose a good quality brand, whether you prefer semi-sweet, milk, or a mix; their melting properties and cocoa flavor are crucial. And of course, fresh, intact Butterfinger candy bars (not just crushed pieces) will give you the best crunch and flavor distribution.
What makes this particular recipe special is how these premium ingredients elevate familiar flavors. The natural sweetness of good brown sugar paired with robust vanilla and creamy butter creates a foundational flavor profile that perfectly complements the unique peanut-butter-toffee flavor of Butterfinger. This isn’t just any cookie bar; it’s a gourmet experience made accessible. Tips for selecting the best include checking expiration dates, choosing brands known for quality, and even tasting your chocolate chips beforehand to ensure they meet your standards of deliciousness. Remember, great ingredients are the bedrock of great baking.
Ingredients You Need
Butterfinger Cookie Bars Recipe
- All-Purpose Flour
- Baking Soda
- Salt
- Unsalted Butter
- Granulated Sugar
- Light Brown Sugar
- Large Eggs
- Pure Vanilla Extract
- Butterfinger Candy Bars
- Semi-Sweet Chocolate Chips
- Milk Chocolate Chips
- Pecan Halves
Chocolate Drizzle Topping
- Semi-Sweet Chocolate Chips
- Heavy Cream
- Unsalted Butter
- Powdered Sugar
- Pure Vanilla Extract
- Flaky Sea Salt (Optional)
Instructions
How to Make The Best Butterfinger Cookie Bars with a Chocolate Drizzle!
Begin your delectable baking adventure by preheating your oven to a delightful 350°F (175°C). Line a 9×13 inch baking pan with parchment paper, allowing some overhang on the sides to create convenient “handles” for easy removal later; this small step prevents sticking and ensures a clean lift. In a medium bowl, whisk together your dry ingredients: the all-purpose flour, baking soda, and salt. Set this aside. In a large bowl, using an electric mixer, cream together the softened unsalted butter, granulated sugar, and light brown sugar until the mixture is light, fluffy, and visibly pale – this usually takes about 2-3 minutes. This creaming process incorporates air, contributing to the bars’ tender texture. Beat in the large eggs one at a time, ensuring each is fully incorporated before adding the next, then stir in the pure vanilla extract. Scrape down the sides of the bowl to ensure everything is evenly mixed.
Gradually add the dry ingredient mixture to the wet ingredients, mixing on low speed until just combined. Be careful not to overmix; overmixing develops the gluten in the flour, which can lead to tough, rather than tender, cookie bars. The dough should be soft and slightly sticky, holding its shape without being too dry or crumbly. Gently fold in the roughly chopped Butterfinger candy bars and both semi-sweet and milk chocolate chips. Some bakers like to reserve a small handful of these to sprinkle on top right before baking for extra visual appeal. Press the dough evenly into your prepared 9×13 inch baking pan. For extra crunch and a sophisticated touch, you can lightly sprinkle some chopped pecan halves over the top. This adds another layer of texture and nutty flavor. Bake for 25-30 minutes, or until the edges are golden brown and a toothpick inserted into the center comes out with moist crumbs, but not wet batter. Do not overbake! The center will set as it cools. Allow the bars to cool completely in the pan before attempting to lift them out.
How to Make the Chocolate Drizzle
While your Butterfinger Cookie Bars are cooling, prepare the luscious chocolate drizzle to adorn them. In a small microwave-safe bowl, combine your semi-sweet chocolate chips, a splash of heavy cream, and a small pat of unsalted butter. Microwave in 30-second intervals, stirring well after each, until the chocolate is fully melted and the mixture is smooth and glossy. Alternatively, you can use a double boiler on the stovetop. Once melted, sift in the powdered sugar and add the pure vanilla extract, whisking until perfectly smooth and lump-free. The consistency should be thick enough to hold its shape when drizzled, but still pourable. If it’s too thick, add another tiny splash of cream; if too thin, a bit more powdered sugar. For an elegant finish, once drizzled, you can sprinkle a pinch of flaky sea salt over the top for a delightful contrast.
Drizzle the Bars
Once your Butterfinger Cookie Bars have cooled completely, which is crucial for clean slicing and a perfectly set drizzle, it’s time for the final artistic touch. Using a spoon or a piping bag with a small tip, generously drizzle the warm, glossy chocolate topping back and forth over the entire pan of bars in a visually appealing pattern. Don’t be afraid to get creative! A simple zigzag offers a classic look, but you could also do horizontal lines or even random swirls. The chocolate will set as it cools, forming a beautiful, slightly firm layer that adds both flavor and an irresistible sheen. For an added flourish, immediately after drizzling, you can sprinkle a few extra Butterfinger crumbs or mini chocolate chips on top before the chocolate sets, enhancing both texture and visual appeal.
More Festive Decorating Ideas!
Embrace your inner artist and make these Butterfinger Cookie Bars even more spectacular with creative decorating! For a seasonal touch, consider drizzling with white chocolate and sprinkling with red and green sprinkles for the holidays, or orange and black for Halloween. For a birthday, embed colorful M&Ms into the top while the chocolate drizzle is still wet, or add edible glitter for a touch of sparkle. You could also create distinct patterns with your chocolate drizzle – perhaps a plaid design, or simple spirals. Elevate the presentation by cutting the bars into smaller squares or even triangles and arranging them on a tiered serving platter. A sprinkle of cocoa powder or a dusting of powdered sugar over the top can also add an elegant finish, providing a lovely contrast to the chocolate drizzle and the golden bars themselves.
Storing Butterfinger Cookie Bars
To keep your Butterfinger Cookie Bars at their optimal deliciousness, proper storage is key. At room temperature, these bars will stay fresh and perfectly chewy for up to 3-4 days when stored in an airtight container. Make sure they are fully cooled before placing them in the container to prevent condensation, which can make them soggy. If you need to prolong their life, refrigeration is a great option. Place them in an airtight container and store in the refrigerator for up to a week; the chilling will make them a bit firmer, but they’ll still be wonderfully flavorful. For longer storage, you can freeze individual bars (once fully cooled) wrapped tightly in plastic wrap and then placed in a freezer-safe bag or container for up to 2-3 months. To enjoy after freezing, simply thaw at room temperature or gently warm in the microwave for a few seconds until soft and gooey. This helps maintain their incredible texture and prevents them from drying out.
PrintButterfinger Cookie Bars
Amazing Butterfinger cookie bars! Get this easy recipe for gooey, chocolatey treats your family will adore. Try it today!
- Prep Time: 20 minutes
- Cook Time: 30 minutes
- Total Time: 50 minutes
- Yield: 18 servings
- Category: Dessert
- Cuisine: American
Ingredients
- 2 1/4 cups All-Purpose Flour
- 1 teaspoon Baking Soda
- 1/2 teaspoon Salt
- 1 cup (2 sticks) Unsalted Butter, softened
- 3/4 cup Granulated Sugar
- 3/4 cup Light Brown Sugar, packed
- 2 Large Eggs
- 2 teaspoons Pure Vanilla Extract
- 4 (2.1 oz each) Butterfinger Candy Bars, roughly chopped
- 1 cup Semi-Sweet Chocolate Chips
- 1/2 cup Milk Chocolate Chips
- 1/2 cup Pecan Halves, chopped (optional)
- 1/2 cup Semi-Sweet Chocolate Chips (for drizzle)
- 2 tablespoons Heavy Cream (for drizzle)
- 1 tablespoon Unsalted Butter (for drizzle)
- 1/4 cup Powdered Sugar (for drizzle)
- 1/2 teaspoon Pure Vanilla Extract (for drizzle)
- 1/4 teaspoon Flaky Sea Salt (for drizzle, optional)
Instructions
- Preheat your oven to 350°F (175°C). Line a 9×13 inch baking pan with parchment paper, allowing some overhang on the sides to create convenient ‘handles’ for easy removal later.
- In a medium bowl, whisk together the all-purpose flour, baking soda, and salt. Set this aside.
- In a large bowl, using an electric mixer, cream together the softened unsalted butter, granulated sugar, and light brown sugar until the mixture is light, fluffy, and visibly pale – this usually takes about 2-3 minutes.
- Beat in the large eggs one at a time, ensuring each is fully incorporated before adding the next, then stir in the pure vanilla extract. Scrape down the sides of the bowl to ensure everything is evenly mixed.
- Gradually add the dry ingredient mixture to the wet ingredients, mixing on low speed until just combined. Be careful not to overmix.
- Gently fold in the roughly chopped Butterfinger candy bars and both semi-sweet and milk chocolate chips. Some bakers like to reserve a small handful of these to sprinkle on top right before baking for extra visual appeal.
- Press the dough evenly into your prepared 9×13 inch baking pan. For extra crunch and a sophisticated touch, you can lightly sprinkle some chopped pecan halves over the top.
- Bake for 25-30 minutes, or until the edges are golden brown and a toothpick inserted into the center comes out with moist crumbs, but not wet batter. Do not overbake! The center will set as it cools. Allow the bars to cool completely in the pan before attempting to lift them out.
- Prepare the Chocolate Drizzle: In a small microwave-safe bowl, combine 1/2 cup semi-sweet chocolate chips, 2 tablespoons heavy cream, and 1 tablespoon unsalted butter. Microwave in 30-second intervals, stirring well after each, until the chocolate is fully melted and the mixture is smooth and glossy. Alternatively, use a double boiler.
- Once melted, sift in the 1/4 cup powdered sugar and add 1/2 teaspoon pure vanilla extract, whisking until perfectly smooth and lump-free. If too thick, add a tiny splash more cream; if too thin, a bit more powdered sugar. Optionally, sprinkle with flaky sea salt.
- Once your Butterfinger Cookie Bars have cooled completely, generously drizzle the warm, glossy chocolate topping back and forth over the entire pan of bars in a visually appealing pattern. For an added flourish, immediately after drizzling, you can sprinkle a few extra Butterfinger crumbs or mini chocolate chips on top before the chocolate sets.
- Store leftover bars in an airtight container at room temperature for up to 3-4 days, or in the refrigerator for up to a week. For longer storage, freeze individual bars wrapped tightly in plastic wrap and then placed in a freezer-safe bag or container for up to 2-3 months.
Notes
Prepare yourselves for an explosion of flavor and texture with these truly irresistible Butterfinger Cookie Bars! Imagine a thick, chewy, golden-brown cookie base, studded generously with crunchy Butterfinger candy pieces and rich chocolate chips, all melded together in perfect harmony. These bars aren’t just a dessert; they’re an experience – a symphony of sweet, salty, and undeniably satisfying crunch that will leave you craving more after every bite. They’re incredibly easy to whip up, making them the ultimate crowd-pleaser for any occasion, promising smiles and satisfied sighs all around.